This Hokkaido Milk Bread is reminiscent of Hawaiian bread, and it seems to stay fresh and soft for a long time. The oven spring is amazing.
Hokkaido milk bread is a favorite in Asian bakeries. It's super soft and slightly sweet. The bread includes something called a a tangzhong, which is a roux of flour and water, which is cooked, cooled, and then added to the bread dough. It has magical properties that turn the resulting loaves into fluffy cloud-like bread. While not the most scientific explanation, it's pretty amazing.
You'll be craving slices of this bread fresh from the oven and slathered with butter.
Equipment recommended:
- You can use a stand mixer or bread maker for the initial mixing of the dough and first rise. You might be able to hand knead it, but the dough is really sticky and it will take you a very long time. I used this stand mixer with the dough hook. It's a workhorse.
- A kitchen scale. They are inexpensive and take the guesswork out of baking with flour. They are also great for dividing the dough into four parts.
- An instant read thermometer to tell when the roux has reached 149 degrees. If you don’t have one, cook the roux until the spoon you are using to stir it leaves a trail.
Note: The recipe calls for caster sugar. If you don't have it on hand, you can just whirl some granulated sugar in your food processor or blender to grind it more finely.
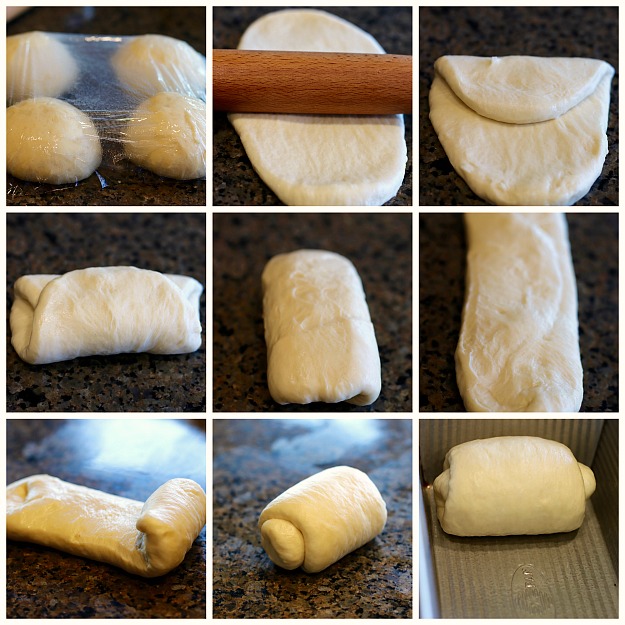
The explanation of how to shape the dough may seem confusing, so I've tried to take some photos of the steps.
Starting with the top left, and moving row to row from left to right, here are the steps:
- Form the dough into four balls.
- Roll each out into a long piece.
- Fold the dough over from the top like an envelope.
- Fold the bottom over the top fold.
- Flip the dough over.
- Roll it out into a long piece again, and flip it over again
- Begin to roll the dough into a cylinder lengthwise.
- Finish rolling the cylinder.
- Turn the cylinder to seam side down, and place in the bread pan.
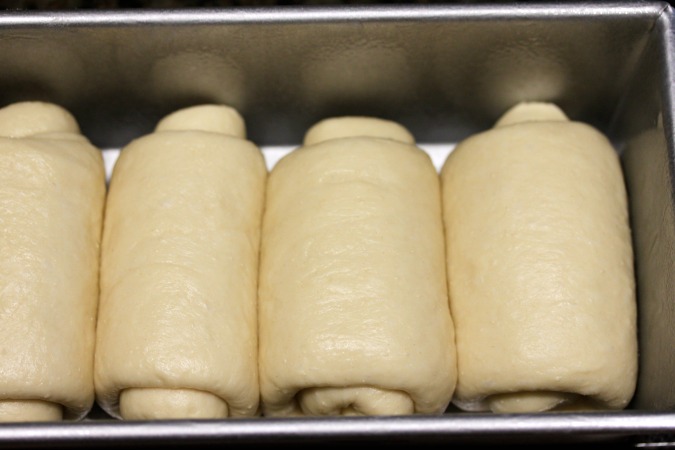
Here they are, all nestled together.
Or, you could use my well worn hand written cheatsheet (I'm a visual learner)!
If you've never tried Hokkaido Milk Bread, or bread using tangzhong, you must. Here are more recipes using tangzhong:
- Sourdough Hokkaido Milk Bread with Tangzhong
- Japanese Milk Bread with Furikake
- Tangzhong Whole Wheat and Rye Bread
- Tangzhong Whole Wheat Bread
- Checkerboard Tangzhong Rolls
- Black Sesame Shokupan (using Yudane)

Hokkaido Milk Bread Using the Tangzhong Method
ingredients:
- 50 grams (1/3 cup) bread flour
- 1 cup water
- 350 grams (2 1/2 cups) bread flour
- 55 grams (3 tablespoons plus 2 teaspoons caster/superfine granulated sugar (see note above)
- 1 teaspoon salt
- 2 teaspoons instant yeast
- 1 tablespoon plus 1 teaspoon milk powder
- 1 large egg
- 1/2 cup milk
- 2 tablespoons room temperature unsalted butter, cut into pieces
- 120 grams (about 1/2 of the recipe) tangzhong
- 1 egg
- 1 tablespoon water
- Pinch of salt
instructions:
- Whisk the flour and the water together until there aren't any lumps.
- Place the mixture into a small saucepan and heat over medium heat, stirring constantly until the mixture reaches 149 degrees F. If you don't have a thermometer, cook until the spoon leaves a trail in the mixture.
- Immediately dump the mixture into a heatproof bowl, and let cool. When it has cooled, cover with plastic wrap, pressing the wrap against the mixture, and refrigerate for 4 to 24 hours.
- Whisk the dry ingredients in the bowl of a stand mixer. You can also use a bread maker for mixing the dough (don't use the bread maker for baking the bread).
- Add the egg milk, and the tangzhong, and mix and knead until a dough forms. Add the butter pieces, and knead on medium high speed for 15 to 20 minutes, until a piece of the dough can be stretched into a very thin membrane.
- Place the dough into an oiled bowl or dough rising bucket, and let rise in a warm spot in your kitchen until doubled in size, about 40 minutes. If your kitchen is cold, this could take longer.
- Once risen, deflate the dough, and divide it into four equal pieces and form them into balls. Cover with oiled plastic wrap, and let rest for 15 minutes. Preheat the oven to 350 degrees F.
- Take each piece and, using a rolling pin, roll out into a long oval shape. Fold the shorter sides of each oval over like an envelope, into sort of a square. Flip the squares over, and roll out into an oval again. Flip them back over, and roll each oval into a roll/cylinder, from one end to the other.
- Arrange the rolls in an oiled 9 inch by 5 inch bread pan, cover with plastic wrap, and allow to rise about 3/4 of the height of the bread pan, about 40 minutes.
- Brush the loaf with the egg wash and bake for 30 to 35 minutes. If the top gets too brown, tent the loaf with foil while baking.
- Remove the loaf from the pan and cool on a wire rack. Let it cool completely.


One question for you - is this bread good enough to follow these insane directions?? :)
ReplyDeleteLol. You might have to be a "bread head" to have the patience, but it is very good if you like super soft fluffy bread.
DeleteYES IT IS , I'T BETTER!!
DeleteKaren, This bread is fabulous! Thanks for sharing with the Artisan Bread Bakers. I enjoyed making and eating it.
ReplyDeleteThanks Cathy!
DeleteMade hot dog and burger buns from this. GREAT! Thanks.
ReplyDelete(Wife said "Perfect" and she always has complained that buns have been to heavy/dense.)
Fantastic. I'll have to try other shapes!
DeleteThanks so much for sharing. Made this twice today. :-). Really soft and fluffy.
ReplyDeleteI really would like to try this. The folding sounds confusing to me. Could you put a step-by-step picture of what you do by any chance? :-) Have you ever just made this in a bread machine (rising and baking)? I am in search of a soft sandwich bread recipe.
ReplyDeleteI will definitely do another post on this with step by step photos. Thanks for the suggestion. I don't own a bread machine, so I'm not sure how that would work.
DeleteAlso, my son has severe allergy to egg. Have you ever tried without the egg by any chance?
ReplyDeleteNo, I haven't tried it without egg.
DeleteI make roux in an 1100-watt microwave. Use a pyrex cup. 1/2-cup room temperature water, 2-1/2 Tbsp flour. Mix well with whisk. Microwave 20-seconds. Stir, take temperature. Will be about 120-F. Microwave 10-seconds. Stir, take temperature. Will be about 135-F. Microwave 10 more seconds. Stir, take temperature. Will be about 145-F. Microwave a final 5-seconds. Stir and take temp. The roux is at about 150-F . This is enough roux for a 1-lb loaf of bread. Cool to below 130-F, add to bread maker.
ReplyDeleteThanks for the contribution! Especially about the microwave. Very precise.
Deletemy daughter has been asking for soft bread. will try this tomorrow, thank you!
ReplyDeleteThank you! You will love this bread, and so will your daughter. Let me know how it works out!
DeleteOh Karen, this bread is wonderful. I definitely will make it. Thank you so much for sharing
ReplyDeleteTHE best bread recipe ever! I have made this bread so many times now; it is definitely my 'go to' bread recipe. Thank you so much for sharing! :-)
ReplyDeleteThank you! It is a revelation, isn't it?
DeleteThanks for posting this recipe and details of how the loaf is made. My loaf turned out beautifully and the oven spring is amazing. I followed your instructions and recipe to the letter although I added an extra 2 tablespoons of flour because I thought the dough was a bit wet. Also, I used my breadmaker to do the initial mixing and proof. Outstanding loaf - soft, light and just as nice a couple of days after baking.
ReplyDeleteThanks so much for the feedback Sharen!
DeleteLove this recipe, we are all raving about the bread rolls I made from it, will never go back to store bought rolls again! Followed instructions to the 't' perfect loaf, thanks for sharing!
ReplyDeleteThanks so much Bernice! I love hearing this.
DeleteHai Karen can i cold fermented this dough?
ReplyDeleteI haven't tried it, but I suspect you could.
DeleteI am very impressed with this post and how well you explained out to make this bread - and your photos are excellent! I definitely will try this out sometime!
ReplyDeleteThanks Shelby! Let me know if you do.
DeleteMy husband loves those yeasty rolls you get from the Chinese restaurant. I can't wait to surprise him with a homemade version.
ReplyDeleteBe sure to check out the rolls recipe link!
DeleteLove learning new recipes and techniques. The step-by-step pics and diagram is awesome!
ReplyDeleteThanks Jolene!
DeletelI can't wait to try this recipe and your instructions are amazing. Thanks Karen!
ReplyDeleteThank you Julie!
DeleteLook at that beautiful fluffy rise on that bread! I need to make this.
ReplyDeleteOh do make it!
DeleteI've never heard of Hokkaido or Tangzhong and had no idea what I was getting into, but the bread looks absolutely incredible and your step-by-step photos help make it much less intimidating.
ReplyDeleteI totally hope you try it!
DeleteYou bread looks beautiful and your step-by-step photos and diagram are really helpful too!
ReplyDeleteThanks so much!
DeleteIt's a beautiful loaf as usual!
ReplyDeleteAww. Thanks!
DeleteWow...I can see why a tutorial would come in handy for rolling this dough...it looks so pretty though...totally worth the effort!!! Faith, Hope, Love, & Luck - Colleen
ReplyDeleteThanks Colleen!
DeleteI have never made bread with tangzhong (I've never even heard of it!) But niw I'm super curious and can't wait to try!
ReplyDeleteIt's pretty cool!
DeleteThis is such a stunning bread - I've never heard of tangzhong but I'm excited to try this recipe
ReplyDeleteI totally hope you do!
DeleteThis is such an interesting bread! I'm glad you included the step-by-step images to help with shaping! Looks fantastic!
ReplyDeleteThank you Amy. I need the cheatsheet too. =)
DeleteI love the diagram, it's so helpful. The bread looks amazing. Fluffy is right!
ReplyDeleteYou can use the dough to make fluffy rolls too.
DeleteThis bread looks so good and I love all of the details in the instructions.
ReplyDeleteThanks so much!
DeleteThank you for the recipe.
ReplyDeleteIt's not clear of you are making two loaves one one. You say that the tangzhong is enough for two loaves, but you don't mention dividing it later on. I used the whole thing and realized my mistake. I ended up kneading in the mixer for about 40 minutes and adding a bit more flour when I rolled out the dough. Other than the loaf baking over the side of the pan I think it will turn out fine. But it may be a good idea to clarify this step. I would just give ozs or Mls of water so people can make half the tangzhong.
Smells great though
Sorry about that!
DeleteSo is the recipe for one final loaf or two?
ReplyDeleteone.
DeleteI made this once and it's a keeper. It's not as complicated as it sounds, making it the second time around. I made enough roux for two breads. I make one bread weekly. This recipe is my favourite and my boyfriend loves it!
ReplyDeleteThat's so awesome! Thanks!
Delete